Why do we need spam filters?
Email spam filters are crucial for keeping your inbox secure and organised.
They block harmful emails, such as phishing scams and malware, protecting you from potential cyber threats.
Spam filters ensure your inbox stays tidy by automatically removing unwanted messages, making it easier to find essential emails without sifting through junk.
For businesses, spam filters improve productivity by reducing distractions and enabling employees to focus on genuine communications.
Additionally, they assist in meeting legal requirements for data protection, ensuring communications remain compliant with privacy regulations.
Here at DreamIT Host, we offer MailScanner as part of our spam filter solution on all of our shared hosting plans to improve our client's user experience.
Click here for cPanel instructions.
Click here for DirectAdmin instructions.
Note: ConfigServer MSFE and MailScanner are the same software.
Follow these steps to use MailScanner (spam filters) in cPanel:
1. Log in to your cPanel account.
For instructions on how to log in to cPanel, please click here.
2. Under the Email section, click MailScanner.

3. You will be presented with the MailScanner interface.
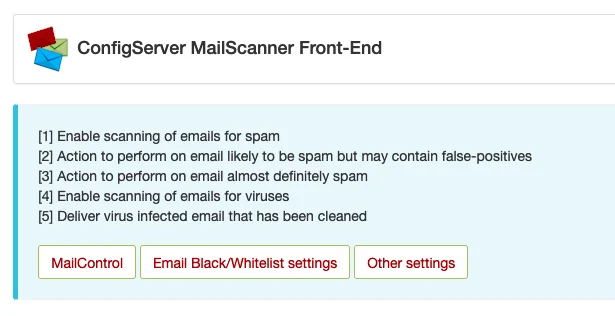
MailControl
MailControl contains your email traffic for any email sent or received by your account.
1. It will present you with the following screen:

All email entries will be displayed here and marked with the corresponding status of each email in these colours.

2. You can utilise the search function and parameters if you are looking for a specific email. To do this, click the Menu button, which will give a drop-down list of settings.
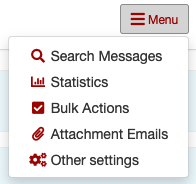
3. Click Search Messages to bring up options to add search parameters.

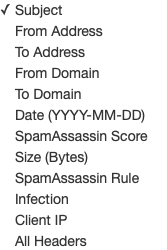
4. The search parameters default with the parameter 'Subject' and the condition 'CONTAINS' with the empty value field.
You can change the Parameter field to the following options:
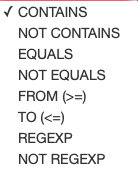
You can change the Condition field to the following options:
The last field is the value you want to search for based on your parameters and conditions.
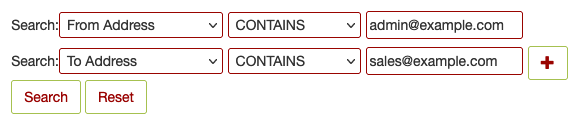
For example, if you were to search for emails sent from the email address ‘admin@example.com’, you would set the parameter to ‘From Address’, the condition to ‘CONTAINS’, and the value field to ‘admin@example.com’.

5. Click the Search button to filter out all emails received from the email address admin@example.com.
You can also add multiple parameters to your search using the + icon.
For example, the below image will filter emails sent from ‘admin@example.com' to ‘sales@example.com'.
If you find a legitimate email marked as spam or a spam email marked as legitimate, you can help the system learn by clicking on that email, as shown below.
Once you have clicked on the email, scroll down to the bottom. You will be able to mark the email as Ham or Spam.
Learn as Ham: Click this button to ensure the system marks a spam email as legitimate in the future.
Learn as Spam: Click this button to ensure the system marks a legitimate as spam in the future.
Releasing Emails
If you continue to scroll down, you can look at releasing/resending those emails that were previously marked as spam and not delivered.
Email Black/Whitelist Settings
Email Black/Whitelist settings allow you to whitelist or blacklist email addresses or top-level domains (such as .au/.ru/.org).
1. It will present you with the following screen:

On the left, you can add in your whitelists, and on the right, you can add in your blacklists.
Note: The allowed formats are *@domain.tld, name@domain.tld, @.tld or IP/CIDR — Only one entry per line.
2. For example, if you wanted to whitelist the email address ‘admin@examples.com' and any email address with the domain name 'example2.com', then your whitelist section would look like this:
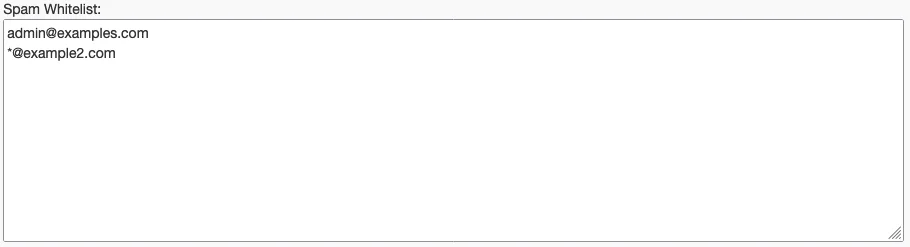
Note: The * is a wildcard symbol, meaning it takes the place of the text of anything before the '@' symbol in this scenario.
3. For example, if you wanted to blacklist any domains with the top-level domain '.au' (domain names ending in .au), then your blacklist section would look like this:
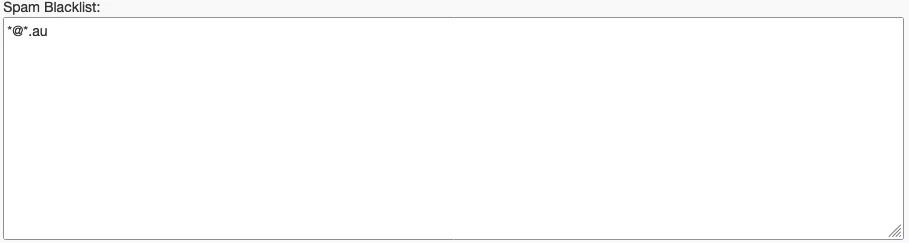
Note: In this scenario, the * symbol is used twice, meaning any text before and after the '@' symbol and before the '.au' will be blacklisted.
Other Settings
Other settings allow you to modify the application's aesthetics and adjust your spam score threshold settings.
1. It will present you with the following screen:

The number of rows to show in the main table: Displays the number of emails within your control panel, as discussed under MailControl.
Table background palette: Adjust the colour associated with the status of an email, as discussed under MailControl.
Low-scoring spam setting: Set the lower-end threshold to define which emails are classified as spam. You can increase the number to increase leniency and let more emails through. You must decrease the number if you wish for less spam. For example, setting your low-scoring spam to 5 will mark any emails with a score of 5 or higher as low-scoring spam. Any emails marked 4.99 and lower will not be marked as low-scoring spam.
High-scoring spam setting: This setting allows you to set the end threshold to define which emails are classified as high-scoring spam. If you want to increase leniency and the threshold, you must increase the number.
Additional Settings
When you first access the control panel, you will also see the options below:
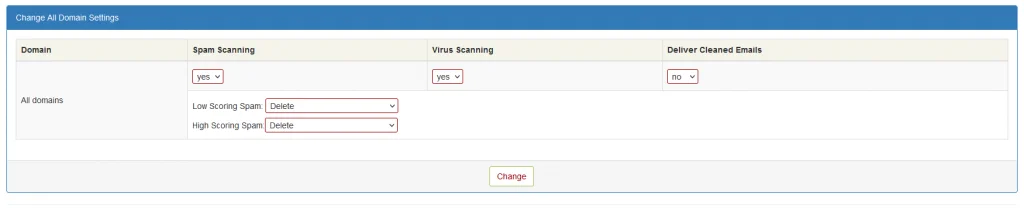
Here, you can set the email outcome for low-scoring and high-scoring spam. You can choose to have these emails deleted from the server or delivered to the intended recipient's spam box.
Follow these steps to use MailScanner (spam filters) in DirectAdmin:
1. Log in to your DirectAdmin account.
For instructions on how to log in to DirectAdmin, please click here.
2. Under Extra Features, click ConfigServer MSFE. Alternatively, you can enter ‘ConfigServer MSFE in the search bar at the top of the page.
![]()

3. You will be presented with the MailScanner interface.
MailControl
MailControl contains your email traffic for any email sent or received by your account.
1. It will present you with the following screen:
All email entries will be displayed here and marked with the corresponding status of each email in these colours.
2. You can utilise the search function and parameters if you are looking for a specific email. To do this, click the Menu button, which will give a drop-down list of settings.
3. Click Search Messages to bring up options to add search parameters.
4. The search parameters default with the parameter 'Subject' and the condition 'CONTAINS' with the empty value field.
You can change the Parameter field to the following options:
You can change the Condition field to the following options:
The last field is the value you want to search for based on your parameters and conditions.
For example, if you were to search for emails sent from the email address ‘admin@example.com’, you would set the parameter to ‘From Address’, the condition to ‘CONTAINS’, and the value field to ‘admin@example.com’.
5. Click the Search button to filter out all emails received from the email address admin@example.com.
You can also add multiple parameters to your search using the + icon.
For example, the below image will filter emails sent from ‘admin@example.com' to ‘sales@example.com'.
If you find a legitimate email marked as spam or a spam email marked as legitimate, you can help the system learn by clicking on that email, as shown below.
Once you have clicked on the email, scroll down to the bottom. You will be able to mark the email as Ham or Spam.
Learn as Ham: Click this button to ensure the system marks a spam email as legitimate in the future.
Learn as Spam: Click this button to ensure the system marks a legitimate as spam in the future.
Releasing Emails
If you continue to scroll down, you can look at releasing/resending those emails that were previously marked as spam and not delivered.
Email Black/Whitelist Settings
Email Black/Whitelist settings allow you to whitelist or blacklist email addresses or top-level domains (such as .au/.ru/.org).
1. It will present you with the following screen:
On the left, you can add in your whitelists, and on the right, you can add in your blacklists.
Note: The allowed formats are *@domain.tld, name@domain.tld, @.tld or IP/CIDR — Only one entry per line.
2. For example, if you wanted to whitelist the email address ‘admin@examples.com' and any email address with the domain name 'example2.com', then your whitelist section would look like this:
Note: The * is a wildcard symbol, meaning it takes the place of the text of anything before the '@' symbol in this scenario.
3. For example, if you wanted to blacklist any domains with the top-level domain '.au' (domain names ending in .au), then your blacklist section would look like this:
Note: In this scenario, the * symbol is used twice, meaning any text before and after the '@' symbol and before the '.au' will be blacklisted.
Other Settings
Other settings allow you to modify the application's aesthetics and adjust your spam score threshold settings.
1. It will present you with the following screen:
The number of rows to show in the main table: Displays the number of emails within your control panel, as discussed under MailControl.
Table background palette: Adjust the colour associated with the status of an email, as discussed under MailControl.
Low-scoring spam setting: Set the lower-end threshold to define which emails are classified as spam. You can increase the number to increase leniency and let more emails through. You must decrease the number if you wish for less spam. For example, setting your low-scoring spam to 5 will mark any emails with a score of 5 or higher as low-scoring spam. Any emails marked 4.99 and lower will not be marked as low-scoring spam.
High-scoring spam setting: This setting allows you to set the end threshold to define which emails are classified as high-scoring spam. If you want to increase leniency and the threshold, you must increase the number.
Additional Settings
When you first access the control panel, you will also see the options below:
Here, you can set the email outcome for low-scoring and high-scoring spam. You can choose to have these emails deleted from the server or delivered to the intended recipient's spam box.